StarPii Find Me..

Link to Amikom


Sejarah Amikom:


Sekolah Tinggi Manajemen Informatika dan Komputer AMIKOM Yogyakarta (selanjutnya disebut STMIK AMIKOM YOGYAKARTA) merupakan salah satu perguruan tinggi swasta yang berkedudukan di Provinsi DIY Kabupaten Sleman di bawah naungan Yayasan AMIKOM Yogyakarta.

STMIK AMIKOM YOGYAKARTA adalah sebuah perguruan tinggi hasil pengembangan dari Akademi Manajemen Informatika dan Komputer "AMIKOM YOGYAKARTA". AMIKOM Yogyakarta sebagai lembaga pendidikan tinggi yang didirikan berdasarkan keputusan Menteri Pendidikan dan Kebudayaan Republik Indonesia No. 084/D/O/1994 tentang Pemberian Status Terdaftar kepada Jurusan / Program Studi untuk Jenjang Program Studi D-III pada AMIKOM Yogyakarta di DIY dan bernaung di bawah Yayasan "AMIKOM YOGYAKARTA”.

AMIKOM Yogyakarta memiliki Program Studi Manajemen Informatika dan Teknik Informatika. Program studi ini masing-masing dikelola oleh seorang Ketua Jurusan dan Sekretaris Jurusan yang didukung oleh Perangkat Dosen, dan Staff Administrasi.

Secara keseluruhan lembaga akademik saat itu dipimpin oleh seorang Direktur dibantu oleh beberapa Pembantu Direktur, Pelaksana Akademik, Unsur Pelaksana Administratatif, Unit Pelaksanaan Teknis, Unsur Penelitian dan Pengembangan dan beberapa unsur pendukung lainnya.

Pada tahun 2002, program D-3 Manajemen Informatika telah di Akreditasi oleh Badan Akreditasi Nasional Perguruan Tinggi dengan SK BAN PT Nomor: 010/BAN-PT/Ak-I/Dpl-III/VIII/2002 dan mendapatkan akreditasi A.

Seiring dengan kemajuan Teknologi Informasi dan Komunikasi (TIK) dan sekaligus untuk memenuhi kebutuhan tenaga ahli yang memahami dan terampil di bidang tersebut, maka AMIKOM menambah program S-1, dan berubah menjadi STIMIK AMIKOM YOGYAKARTA.

Berdasarkan Surat Keputusan Menteri Pendidikan Nasional Republik Indonesia tanggal 24 April 2002, Nomor. 75/D/O/2002 tentang Pemberian Ijin Penyelenggaraan Program-Program Studi dan Pendirian Sekolah Tinggi Manajemen Informatika dan Komputer (STMIK) AMIKOM Yogyakarta di DIY (Perubahan bentuk dari AMIKOM) yang diselenggarakan oleh Yayasan AMIKOM Yogyakarta di DIY.

Berdasarkan Surat Keputusan tersebut, STMIK AMIKOM YOGYAKARTA diberi ijin untuk menyelenggarakan program studi:

Teknik Informatika untuk jenjang Program Sarjana (S1)
Sistem Informasi untuk jenjang Program Sarjana (S1)
Manajemen Informatika untuk jenjang Program Diploma - III (D-3)
Teknik Informatika untuk jenjang Program Diploma-III (D-3)

Penyelenggaraan Program Studi Sistem Informasi untuk jenjang Program Sarjana (S1) secara khusus didukung oleh Departemen Pendidikan Nasional, dengan surat Direktur Jendral Pendidikan Tinggi Nomor: 2704/D/T/2004 perihal Perpanjangan Ijin Penyelenggaraan Program Studi pada STMIK AMIKOM YOGYAKARTA.


  • Badan Hukum : Yayasan AMIKOM Yogyakarta
  • Berdiri : 11 Oktober 1994
  • Akte Pendirian : 17 April 2008
  • Alamat : Jalan Ring Road Utara Condong Catur Depok-Sleman
  • Telpon : 0274 - 884201 - 204
  • Faksimili : 0274 - 884208
  • Website : http://www.amikom.ac.id
  • Email : amikom@amikom.ac.id

  • Pengurus :
  • Ketua : DRS. KALIS PURWANTO, M.M.
  • Sekretaris : SIWININGTYAS AGUSTIN
  • Bendahara : DRS. AUDITH M.TURMUDHI, M.M.
  • Rektor/Ketua/Direktur : PROF. Dr. MOHAMMAD SUYANTO, MM.
  • Pembantu/Wakil I : IR. RUM MUHAMAD ANDRI K RASYID, M.KOM.
  • Pembantu/Wakil II : RAHMA WIDYAWATI, SE., M.M.
  • Pembantu/Wakil III : DRS. MUHAMMAD IDRIS P, M.M.

  • Blog

    Saturday, March 10, 2012

    How to Install Plug-in Filters in Photoshop

    0 komentar
    Among the most popular questions asked by newbies about Adobe Photoshop compatible plugins are:
    Where do I install a plugin and how do I load it afterwards?
    A plugin (or plug-in) is a computer program that integrates into another program adding new features and increasing functionality. Adobe lets you install plug-in filters from other software developers in its programs.
    Some Photoshop compatible plugins have an installer that will guide you through the process.
    But what should you do if plug-ins are not added in Photoshop?
    How to install these files? It's as easy as pie.
    All you need to do is to copy (or drag) the file into the Plug-Ins sub-folder of the Photoshop folder.
    For example, for Photoshop CS3 it's typically located at: 
      Program Files\Adobe\Adobe Photoshop CS3\Plug-Ins (for Windows) or Applications\Adobe Photoshop CS3\Plug-Ins (for Mac OS).
    If you have installed Photoshop in any other location you should look for the Plug-Ins folder there.

    Bear in mind that Photoshop must be closed when installing new plugins.
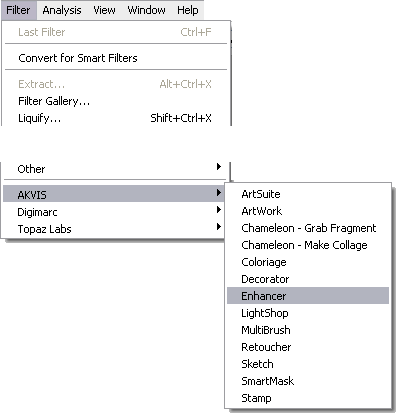
    Next time you start Photoshop, the plugins will be available in the menu Filter:


    Some Useful Tips:
    • Photoshop recognizes plug-ins located in subfolders and subdirectories inside the Plug-Ins folder.
      You can classify your filters by developer or by task. Just create a new folder inside the Plug-Ins folder and put the files in it.
      However, the list of plugins in the Photoshop menu (under Filter) looks different from the list in the Plug-Ins folder. In the Photoshop menu plug-ins are usually classified by developer.
    • Photoshop also recognizes shortcuts (Windows) and alias (Mac OS) within the Plug-Ins folder and subfolders.
      Install your plug-in filters into any folder outside Photoshop, and then create a shortcut for the ".8bf" file (or "make alias" on Macintosh) and place it into the Plug-Ins folder.
      With shortcuts you can manage your plugins quickly and safely.
    • You can select an additional plug-ins folder in Photoshop Preferences.
      Call the command Edit on Windows or Photoshop for Mac OS, then -> Preferences -> Plug-ins & Scratch Disk.
      Select Additional Plug-ins Folder, then use the button Choose to select a folder or directory from the list.
      Attention!
      If you select the Additional Plug-ins Folder in Photoshop 32 bit, make sure that the folder does not contain the 64 bit files (64-bit version of the plugin), otherwise you will get an error message!


    Read more

    All Plug-in Photoshop

    0 komentar
    Read more

    Plugins Collection for Photoshop [x86/x64]

    0 komentar
    Adobe Photoshop Plugins Collection 2010 (x86/x64) | 2.58 GB
    [Mediafire Software]


    >> System requirements:

    Windows XP, Windows Vista or Windows 7

    1.8 GHz or faster Pentium 4 or equivalent with SSE3 support

    2GB RAM

    3GB of hard drive space

    OpenGL 2.0 Capable video card with 256 MB VRAM at 1280?800 and millions of colors or higher.

    Adobe Photoshop CS2, CS3, CS4 or CS5

    Adobe Lightroom 2

    Integration with Lightroom requires Photoshop CS2, CS3, CS4 or CS5

    Photoshop Elements 7 or 8

    Internet connection for activation, auto updates and video tutorials.

    Administrator privileges to install and uninstall

    Microsoft. NET 3.5 framework or higher


    in Plugin:

    OnOne Plug-In Suite 5.1.1

    Alien Skin
    Topaz 7in1

    Topaz 7in1:
    Plug-in for Adobe Photoshop to create the HDR-images without the occurrence of luminous halos. Also, using Topaz Detail, you can increase or decrease the sharpness of the image, convert images to greyscale with full control of tonal range. The essence of the plugin is as follows: Topaz Detail share photos on the three types of parts ? small parts, medium and large items ? and gives full control over every type. This gives unlimited possibilities for beginners and professional photographers, who will be able to achieve high quality and sharpness of the image with just one plug.

    Contents:

    Topaz Detail v2.0.4

    Topaz DeNoise v5.0.0 for Windows/MacOSX

    Topaz Simplify v3.0.1

    Topaz ReMask v2.0.4

    Topaz Adjust v4.0.3

    Topaz DeJPEG 4.0.1

    Topaz Clean v3.0.1 For Windows/MacOSX


    Alien Skin Software Collection add Plug-ins:

    The collection of all the latest release to date graphics filters by Alien Skin Software for Adobe Photoshop. These filters will be useful for both novice and professional users of Photoshop. With them you cmozhete easily and accurately process or to decorate your pictures.

    Platform: Windows XP, Vista, Se7en

    Compatibility with Vista: complete

    Language: English only

    Download :

    Plugin Photoshop
    Password: hvn
    Credit to uploader


    Read more

    Poster from the Words

    0 komentar
    Would you like to make your own cool musical poster? This Photoshop tutorial will teach you how to do it.


    Resources :


    Step 1

    First we are going to create a new document in Photoshop with 1000×1000 pixels with all the default settings. Fill the background layer with black color.


    Step 2

    Select Horizontal Type Tool and place any text (white color, caps on) filling all background as you can see below. Only use one text layer.


    Rotate text 45 degrees CW by going to Edit > Transform > Rotate.


    Step 3

    Open photo and copy it to our canvas over text layer. Go to Edit > Free Transform and resize photo to something similar to what I have


    Select text from text layer (Ctrl+left click on text layer thumbnail in layers). Press Ctrl+Shift+I to invert selection. With selection active, select photo layer and press Delete to clear selection contents.


    Press Ctrl+D to deactivate selection.


    Apply Image > Adjustments > Brightness/Contrast.


    Step 4

    Create a new layer. Select Horizontal Tool (Arial, white color, 55px) and write something like “DJ Music!”. Create a second new layer and write “Only best hits!” (Arial, white color, 25px)


    Rotate text 45 degrees CW by going to Edit > Transform > Rotate on both layers.


    Apply Layer > Layer Style > Blending Options > Outer Glow to both layer to make it more readable.


    Final Image


    Read more

    Saturday, March 3, 2012

    Foggy Window Effect in Photoshop

    0 komentar


    So in this tutorial I will show you how to create a foggy window effect in Photoshop. We will use a stock photo, brushes, and layer styles to create the effect. The whole process is quite simple and it won't take you more than 30 minutes to achieve the same result.


    Step 1

    Open Photoshop and create a new document. I'm using 2560x1440 pixels for the document size. After that I filled tha background layer with a dark grey. This part will be necessary to create the water drops.


    Step 2

    Go to Window>Brushes to create the brush for the water drops. Follow the image below for the settings but it's important to change the shape to an ellipse and also for this first part the brush has to be very soft.


    Step 3

    Add a new layer and group this layer into a folder. Then change the Blend Mode of the folder to Color Dodge. With the Brush Tool (B) and white for the color, paint with the Brush Tool some drops. As you can see the blurry edges of the little objects sort of melt with one another depending how close they are. That is really important to make the drops more realistic.


    Step 4
    Select the background layer and the group with the drops and merge them into on layer. After that go toImage>Adjustments>Levels. Change the Black Input to 124 and the White to 161. The values might vary depending on the drops, so just make sure that you get rid of the blurry edges.


    Step 5

    With the Magic Wand Tool (W) select the black area, then go to Select>Similar to make sure all the black areas get selected. Then delete this area.


    Step 6

    Import an image to use in our design. The one I'm using is courtesy from Thinkstock and you can find it here
    . Duplicate this layer because we will use it a few more times with different blur values.


    Step 7

    Go to Filter>Blur>Gaussian Blur. Use 20 pixels for the Radius.


    Step 8

    Go to Layer>Layer Styles>Color Overlay. Use a dark grey for the color and change the Opacity to 60%.


    Step 9

    Now put the water drops in front of the image and let's apply some layer styles to give them the realistic effect we want.


    Step 10

    Go to Layer>Layer Styles>Blending Options and change the Fill Opacity to 0. After that selectInner Shadow. Use white for the color and LInear Dodge for the Blend Mode, for the Opacity use 50%, for the angle 90º, then for the Distance use 3 pixels and for the Size use 5 pixels. Also change the Contour mode to the Cone one.


    Step 11

    Select Bevel and Emboss. Change the Depth to 350%, the Direction to Down, the Size to 7 pixels, the Soften to 5 pixels, then over the Shading options use 54º for the Angle and 42º for the Altitude. Also change the Gloss Contour to the Cove Deep one, the for the Highlight Mode use 80% with white and Color Dodge for the Blend Mode, then for the Shadow Mode use Multiply with black and 50% of Opacity.


    Step 12

    Select Inner Glow then for the Blend Mode use Darken with 40% Oapcity and black for the color. Change the Source to Edge and the Size to 25 pixels.


    Step 13
    Now select Color Overlay and use (#907f72) for the color with Color Dodge with 45% Opacity.


    Step 14

    The last layer style option will be Drop Shadow. Use Multiply for the Blend Mode, black for theColor and 20% Opacity. Change the Angle to 90º and use 9 pixels for the Distance, 5% for the Spread and 10 pixels for the Size.


    Step 15

    Make the photo without blur visible again and go to Filter>Blur>Gaussian Blur. Use 5 pixels this time. Then over the Layer Palette click with the right button of the mouse on the thumb of the water drops layer, then select "Select Pixel" to select just the water drops.
    Select the photo that we applied the 5 pixles Gaussian Blur and go to Layer>Layer Mask>Reveal Selection. This way the image with 5 pixels blur will be only visible beneath the water drops.


    Step 16

    Select the layer mask that we created in the previous step and go to Filter>Blur>Motion Blur. Use -90º for the Angle and 80 pixels for the Distance.


    Step 18

    After the motion blur, go to Image>Adjustments>Levels. Change the black and white inputs again to get rid of the blurry edges caused by the blur. You will have an effect like the image below as if the water drops were running down on the window.


    Step 19
    Duplicate the layer with the photo that we applied the Gaussian Blur with 5 pixels for the radius only and delete the layer mask. The with the Horizontal Type Tool (T) add a text with a handwriting font, or if you have a tablet or is really good with the mouse you can write with your own handwriting. Again select just the pixels of the text like we did in the Step 15. Then mask this new photo with the shape of the text, so again the photo will be visible only beneath the text area.


    Step 20

    Add a new layer and with the Brush Tool (B) and the same brush we created the water drops, add more water drops and especially over the text area like the image below. To apply the same layer style of the water drops, just click with the right button of the mouse over the water drops layer and selectCopy Layer Style, then on the new layer with the small water drops click again with the right click of the mouse and select Paste Layer Style.


    Step 21

    Duplicate the photo again and delete the layer mask, after that go to Layer>Layer Mask>Hide All. Select the thumb of the layer mask and go to Filter>Render>Clouds. Make sure you had black and white for the colors. This will apply a cloud texture to the foggy window effect, that will make it more realistic.


    Step 22

    Select all layers and duplicate them, after that merge all the duplicated layers into one. You can also use the keyboard shortcut Command+Alt+Shift+E. Then go to Filter>Blur>Gaussian Blur. Use 20 pixels for the Radius.


    Step 23

    Change the Blend Mode of this blurry layer to Overlay with 40% opacity.


    Step 24
    Duplicate the previous layer and just change the Blend Mode to Screen, keep the same 40% of Opacity.


    Step 25

    Add a new layer on top of the others and fill it with a radial gradient using dark grey and light grey for the colors. Also use Multiply for the Blend Mode.


    Conclusion
    Here is the outcome of the tutorial. As you can see the technique used is pretty simple it was all about Layer Styles, Masks and basic filters. The most important thing was to understand how to recreate the effect using the tools available in Photoshop, in this case I spend hours analyzing a foggy window trying to get the basic characteristics to make the effect realistic. Now it's up to you.


    download file PSD : http://bit.ly/wYHpk5
    Read more

    Instagram your images using Photoshop

    0 komentar


    My all-time favorite Instagram filter is the "Nashville" and today, I will show you a quick tutorial about how to achieve that same effect on your images. It's a very simple effect and very easy to accomplish in Photoshop.

    Step 1
    Open your image in Photoshop and double-click on the background layer to make into a layer and named it Nashville.
    For this tutorial, I've used an image from Patrick Smith from Patrick Smith Photography. You can check more of this work on his Flickr page at http://www.flickr.com/photos/patrick-smith-photography.


    Step 2

    Create a new layer and fill it with the color (Red: 247 , Green: 217 , Blue: 173) and leave the opacity to 100% and your blending options to "Multiply".


    Step 3

    Click back on the "Nashville" layer and click Image > Adjustments > Curves. First go into the green channel and put the output to 37 and then go to the blue channel and put the output to 133.


    Step 4

    After click Image > Adjustments > Levels, change the gamma (the middle) to 1.36 and the input to 236.


    Step 5

    Now let's play the contrast by going to Image > Adjustments > Brightness / Contrast. Put the brightness to 6 and contrast to 51. Don't forget to uncheck "Use Legacy" if it is checked.


    Step 6

    Give another curves to the image by again going to Image > Adjustments > Curves. But this time go to the green channel and put the input to 13 and in the blue channel, put the input to 88.


    Step 7

    To give more depth let's change again the contrast by going to Image > Adjustments > Brightness / Contrast. Simply enter the brightness to -6 and contrast to 33.


    Step 8

    Give another one last curves touch by going to Image > Adjustments > Curves. Go to the red channel and put the output to 4 and in the blue channel, put the output to 14. Lastly merge all the layers to visible.


    Final WordsThat's it! This is how we create the "Nashville" filter from Instagram in Photoshop. At this point, the rest is up to your creativity to experiment different concepts to finish this image.You can also use the same technique for your own images and also create an action in Photoshop. By creating an action, you'll just have to play the action instead of redoing all the steps!


    to download file PSD : http://bit.ly/zoqaUz
    Read more

    Followers


    Learning Together... Design by CupiiCipee © 2012